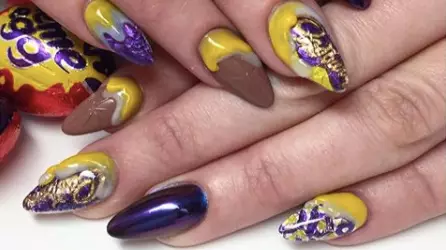
The jury's out on how to eat a Creme Egg, but surely we can all agree they look amazing as a manicure?
Yes, Creme Egg nails are the latest - and tastiest - beauty trend to be doing the rounds, and they look so delicious they'll have you nibbling at your nails.
Inspired by the cream-centred Cadbury snack, the manicure fragments of chocolate, cream and even foil wrapping reimagined on your tips.
Advert
Certainly a step up from your basic French tips, manicurists both amateur and professional alike have been having a go at the chocolatey design - and you can too.
Award-winning nail artist Ania Kesiak has given Tyla a step-by-step guide on how to achieve the nails at home.
Firstly, the nails are made up of a few different looks - the Wrapper Foil Look, 3D Creme Egg Design Look, Chocolate Look and Chrome Look - which you can mix and match as you please. Want more chocolate nails than foil wrapper nails, or vice versa? No one is stopping you.
First, you'll need to get your kit sorted.
Advert
For the entire thing, you'll need: a UV/LED lamp, clear gel, clear gloss topcoat, soft white acrylic powder, yellow acrylic powder, brown acrylic powder, black acrylic powder, chrome topcoat, purple chrome powder, 3D Brown Gel, a nail file and a Creme Egg or two.
Once you've got all that, just follow the instructions below:
Wrapper Foil Look
Advert
1. Apply the tip to extend the nail to desired length.
2. Cut out the Cadbury Creme Egg Foil Wrapper to the size of the nail.
3. Apply thin layer of clear gel - dry under LED / UV Lamp.
4. On the sticky layer of the gel apply the wrapper foil.
Advert
5. Cover the whole nail with clear acrylic.
3D Creme Egg Design Look
1. File the nail to the shape and finish with Gloss Top Coat or Matte.
2. Apply thin layer of Soft White Acrylic Powder to the shape of a runny egg - this is our 'EggWhite' look
Advert
3. Once its dry apply another thin layer of Yellow Acrylic Powder covering the soft white part but not all the way down - this our 'Yolk' look
4. Let it dry and apply Gloss Top Coat on the 3D design.
Chocolate Look
1. Extend the nail with a Brown Acrylic Powder.
2. File it to desired shape.
(Option A)
3. Apply thin layer of a 3D Brown Gel, make the surface smooth with a brush.
4. With a very thin, long brush make diagonal strokes.
5. Let it dry under UV/LED Lamp.
6. Add the 3D Egg Design on top.
(Option 2)
3. Apply thin layer of Brown Acrylic Powder, make the surface smooth with a brush.
4. Before Acrylic dries with a needle, tooth pick, or thin brush press onto acrylic to make the diagonal strokes.
5. After acrylic is dry apply the 3D Egg Design.
Chrome Look
1. Extend the nail with a Black Acrylic Powder.
2. File it to desired shape.
3. Apply Chrome Top Coat - dry under UV/LED Lamp.
4. Apply Purple Chrome Powder.
5. Finish it with Gloss Top Coat.
Et voila! The tastiest nails in the biz.
Featured Image Credit: @aniakesiaknailsTopics: Beauty News, Nails, Creme egg, Easter